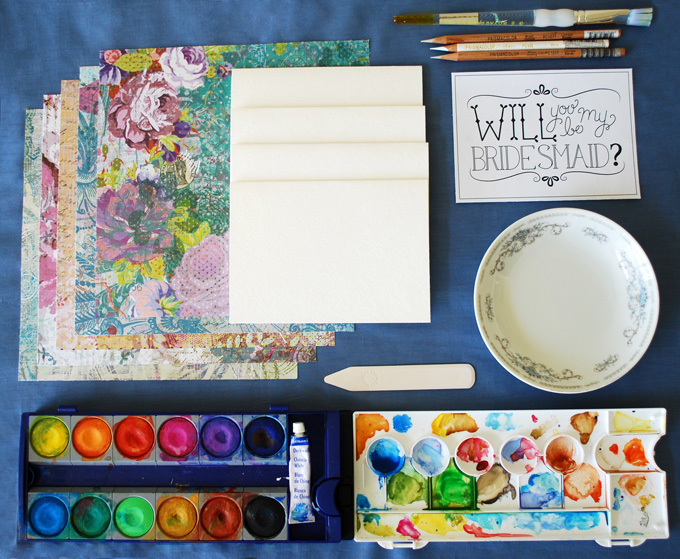
If you have been loving the watercolor and ombre trend recently, you are going to LOVE this amazing DIY Sarah is bringing us today! She is sharing a sweet way to ask your bridesmaids if they will stand by your side on your wedding day. This DIY is so adorable and super easy! It is even more awesome because this technique can be applied to so many elements in your wedding (hello, fabulous escort cards and favor tags!)

It’s DIY time again, lovely readers! This time I have a super “artsy” project for you! We are going to be painting “Will you be my bridesmaid?” cards, inspired by all the gorgeous watercolor stationary we have been seeing lately. I’ve got a downloadable custom design for you to use, but if you are feeling extra creative, come up with your own design! It’s such an easy project, and your maids will feel so special when you tell them you handpainted their cards and made the matching envelopes yourself! This project will take 2-3 hours to complete.

Materials
- Watercolor paper cut into 9″x6.25″ rectangles, folded into cards(size A6: 4.5″x6.25″), 1 per bridesmaid
- Watercolor paints (the cheap Crayola one will work just fine!)
- White colored pencil or colorless blender pencil (Prismacolor makes one that is available at most craft stores)
- Scrapbooking or decorative paper cut into 9″x9″ squares.
- Small pieces of leftover watercolor paper for envelope labels
- Medium flat paintbrush
- Glue
- Bone folder (optional)
- Tape
- Cutting mat and xacto knife, or rolling cutting board
- Templates from this DIY (Card Design Here and Envelope Template Here), or your own designs, printed onto printer paper
Helpful hints: Using a bone folder to fold the paper is very helpful, since watercolor paper tends to be thicker than printer or scrapbooking paper. It will give you a nice, clean fold. Also, use an X-acto knife, ruler, and cutting mat or a rolling cutting board to cut your paper, rather than scissors, to have a precise, even cut. Additionally, if the inside of your cards are too bumpy to write on, glue in a small piece of cardstock that is slightly smaller than the card.

Step 1: Cut all of the paper (watercolor and scrapbook) to the sizes indicated above. Fold the watercolor paper in half to make 4.5″x6.25″ cards. Unfold one of the watercolor paper cards and position the template with the words on it underneath the top flap. Hold it up to a window and tape in place, so that you can easily trace the words from the template. Using your colorless blender pencil, trace over the words/design, pressing hard with the pencil. You want the watercolor paint to be repelled by the wax of the pencil, so make sure you fully cover the area of the design you want to remain white.
Step 2: After the design is fully traced onto the card, un-tape and place on your work surface. Decide what color paint you would like to use, and with a wet brush (not dripping!), gather the paint onto your brush. Paint around the design to create an organic, flowing border, then fill in with the middle. Use different colors within the same color palate, mixing to get a blended, gradient look. Keep it moist as you work, but not soaking wet. You want the paint to mix on your paper.


Step 3: Once you have a color story you like, set aside to dry, and repeat with the rest of your cards.
Step 4: When the cards are mostly dry, take a small scrap of paper towel, or a q-tip, and wet it. Go over the white design and wipe away any paint that is left on it. The wax should resist most of the paint, but this will help take off any that was leftover and make it whiter and brighter. If you wish, you can go over the lines with your white colored pencil to brighten them even more.

Step 5: While the card is drying, take your scrapbooking paper and lay it design side DOWN in front of you. Measure 4.5″ from each side of one corner and mark with a pencil. Connect the dots with a light pencil line. Repeat with the opposite corner. Then, with the other two corners, do the same thing, but measure 5.5″ from each side of both corners. Your paper should look like the example template. Cut the small triangles that form from the pencil lines (see the grey areas on the template).
Step 6: Using the bone folder again, with the paper still facing design side DOWN, fold along the lines you just drew, and glue the two smaller flaps and one large flap together, leaving the other large flap up and open. You have a beautiful, custom made envelope! Your finished measurements should be: 5 x 6 3/8. If you want, glue the scrap pieces of watercolor paper on to the fronts of the envelope, to create a label for the name of the girl to whom you are giving the card.

Each little work of art will be such a sweet way to invite your best girls to stand next to you on your most special day! Have fun and stay crafty! Until next time!


